HOME PICTURES RAKU MAIN PAGE
Lakeside Pottery Raku Workshop Guide

Version 2.0 Morty Bachar - E-mail us
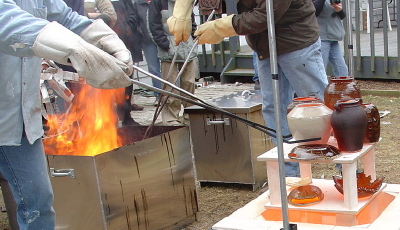
COPYRIGHT Lakeside Pottery LLC COPYRIGHT and linking policy details

________________________________________________________________________________________________

Table of Content

1) What is Raku

History of Raku: The making of Raku ware was initiated by Chojiro, the first generation of the Raku family, during the Momoyama period (1573-1615). At this time three-colored glazed pottery (san cai) based on technology from the Fujian region of China was produced in and around Kyoto. Chojiro is thought to have been familiar with such techniques. A written record confirms that Ameya, Chojiro's father, originally from China, is thought to have been the person who introduced the techniques of three-colored glazed pottery from China, although none of his works has survived to prove this. These Japanese san cai wares were not, however, called Raku ware and it was only after Chojiro had become acquainted with the teamaster Sen no Rikyu (1522-1591) and had started making tea bowls for the tea ceremony (chanoyu) that Raku ware came into being. It could be said that the origin of Raku ware lay in the making of a single tea bowl for the tea ceremony.

Current process of Raku: Pots are fired to 1800F degrees. At that time, the pots are carefully removed, with long tongs, and placed in a special paper lined metal can. Then, the heat from the piece ignites the paper, causing a reaction in Oxygen with the copper in the glaze. The result is a wide range of colors on the surface of the pots. A lid is then quickly put over the metal can, and the ware is allowed to cool for 30 – 60 minutes or longer in the reduction atmosphere. The pots are then removed from the can and the beautiful colors, luster, and patterns are revealed. Raku pieces will not hold water and to be used only as a decorative art form.


2) Requirements and Safety

Clay: Use clay that is suitable for Raku (e.g., with grog). Here at Lakeside Pottery we used Baldwin 192 made by Standard and can be purchased for NY/NJ Ceramic Supply (800-7CERAMIC - ext 202).

Bisqued pots: Students will bring their own bisqued pots. To prevent possible cracking, pots need to be well made (uniform thickness) and avoid flat forms.

Size Requirements: Pots should be no wider than 8" and no taller than 14".

Number of pots: A maximum of 8 pieces per student - if time permits, will fire extras.

Safety is where most attention is required.
.....a)   Only trained personal can operate the kiln
.....b)   Always wear goggles and gloves when operating the kiln or the reduction chambers.
.....c)   Do not "hang around" the kiln or the reduction chambers. Both are very hot including the outside surfaces.
.....d)    Wash hands before eating.  The glazes can harm you.
.....e)    Hot pots will be placed in the holding station after removed from the reduction chamber - do not touch without
..........gloves; they can still be hot.
.....f)     When very Smoky, avoid breathing the smoke it - move to a different area of the yard.
.....g)    Synthetic or wool clothing can get damaged with heat around the kiln and the reduction chambers. Wear
.......... Cotton cloths. Long hair and loose clothing must be constrained.


3) Glazing The Pot

We have several options of glazes and they all proven to be successful. Most are dipping glazes and some are brush-on.   A spray station is also available but please use only with pieces that do not fit the 5 gallon buckets.

a)   Apply the same rules as in regular glazing
.......... i.      ¼ clearance from the bottom (use wax resist)
.......... ii.      do not apply too much glaze and when mixing two glazes, ................stay.away from bottom
b) Glaze and pot must be completely dry before entering the Raku kiln. 
All glazed pots will be placed in our.electric kiln (200 degree F) for at.least 30 minutes.
c) The Crackle White glaze creates the crackles most effectively when
applied thinly thin pots.

Our Raku Glazes

4) Heating in the Raku Kiln to Cone 07

The firing method we use is "Oxidation gas Firing" using propane tanks; temperature rise is rapid. Thick or not uniform thickness pots could crack.  The kiln was custom designed to effectively reach the proper temperatures at the proper rate, to be safe, easy to use and minimize cracking. 

The propane gas pressure and temperature rise is controlled to minimize breakage.   The temperature rate increase will slow down at around 1030 degrees (quartz inversion stage - see appendix A).   The kiln will be shut off after it reached Cone 07 (1,830 degree F) and soaked at that temperature for 2-3 minutes.


5) Removing Pots From Kiln & Placing in Reduction Chambers

The propose of the reduction chamber ("can") is to generate live and strong fire around the pots that were just removed from the kiln and then have the flames suffocate by covering the chamber tightly.  The fire is now starved for Oxygen and therefore is taking it from the glazes on the surface of the pots. How much oxygen was taken and at what temperature determines the color effect.  For example, if a Copper Oxide glaze is used (green) and all the Oxygen was removed, Copper Oxide will turn to pure copper and where it did not, it will stay green.

There are so many factors that go into how your piece will turn out: how fast you reach temperature in the kiln, the temperature you pull at, the temperature outside that day, how fast you go into the can, how fast the paper ignites, how long you hold the pots in the flames before you set it down, and how quickly you get the flames out when you put the lid on the can. By letting the pots cool as you bring it from the kiln will make the colors lighter the longer it cools.

.....a)      Line up the reduction chamber with organic material (e.g., newspaper, leaves, straw)

.....b)      Remove the pots with tangs from the kiln and go into the can slowly getting the fire started

.....c)      Move the pots through the flames but without touching the sides or one each other and place on the bottom
..........of the chamber.

.....d)     Close the lid with a tight fit. Don't pop the lid open once closed. If you do pop the lid to allow some air
..........in do it very quick.

.....e)     Let your pieces totally cool in the can for at least 30 minutes (longer for thick / heavy pieces). The color
..........will last longer if you don't rush and remove the piece earlier.


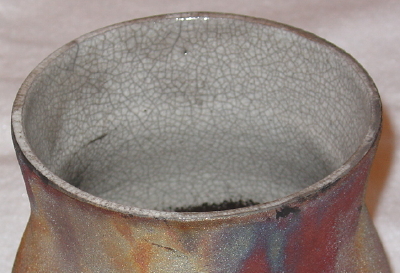
6) Removing From Reduction Chamber and Cooling Off

a)     Remove pots with tangs and place on a platform until it cools of to approx. 300F. 

b)     At 180F, the pot can be rinsed in water and cleaned with a stiff brush.

c)      After you have rinsed the piece, dry it to set and hold the colors. If the piece remains damp the color will start to fade right away.

d)     If you are not going to show or sell the piece, when you get home, put it in a plastic bag store it. Raku should never be left out in the sun and it does best in a cool dry place. Raku pieces will not hold water and to be used only as a decorative art form

____________________________________________________________________________________________

Appendix A - Firing Stages

Initial Kiln Drying
Complete drying doesn't take place until the piece is in the kiln. This happens when the boiling point of water has been reached (100 degrees C, or 212 degrees F.) This must happen slowly, or the formation of steam within the body of the clay may cause it to burst. For this reason, the early stages of firing are done slowly, and with a peephole or lid open for steam to escape.

Dehydration
The next change which occurs is at about 350 degrees C (662 degrees F), the point where the chemically combined water of the clay is driven off. This is water that is part of the molecular structure of the clay, not the previously described water that is between the particles of the clay. This drying is completed by about 500 degrees C (932 degrees F). After this point you could no longer mix the dried clay with water to make new wet clay. An irreversible chemical change has taken place, known as dehydration. No shrinkage is observed during this stage.

Burn-off
Another thing which happens up to about 900 degrees C (1652 degrees F) is the burning off of organic and inorganic materials, such as carbon and sulphates. These are the fumes that it is important not to breathe, and the reason a kiln should be well ventilated even during bisque firing.

Quartz Inversion
After dehydration, the next change that happens is Quartz Inversion, which happens at 573 degrees C (1064 degrees F). At this point, quartz crystals rearrange themselves into a slightly different order. A slight and temporary increase in volume occurs at this point. This is why you always need some space around pieces during firing, as they will expand somewhat. Firing should p
roceed slowly during this Quartz inversion. A large percentage of ware that is cracked during firing happens from fast firing through this stage. The factory set program on electronic kilns usually slow down the firing at this stage for you.

Vitrification
The next stage that happens is vitrification. This is the hardening, tightening and finally the partial glassification of the clay. Vitrification results from fusions or melting of the various components of the clay. The strength of fired clay is increased by the formation of new crystalline growth within the clay body, particularly the growth of mullite crystals. Mullite is an aluminum silicate characterized by a long needlelike crystal. These lace the structure together, giving it cohesion and strength.

Shrinkage happens at the vitrification stage. This is due to diminished size of the particles as they approach fusion and to the closer arrangement of particles in their glassy matrix. The firing shrinkage of a clay is usually about the same as the drying shrinkage. Total shrinkage will usually be about 8-12%.

Clays vitrify at various temperatures depending upon their composition. A red clay high in iron and other impurities might fire to hardness at about 1000 degrees C (1832 degrees F) and melt to liquid at 1250 degrees C (2282 degrees F). A kaolin body which is very free from impurities might not melt until over 1800 degrees C (3272 degrees F)! By mixing the ratios of different types of clays that melt at different temperatures, clay bodies are developed for different firing temperatures.

Melting
If you fired high enough, the clay would first swell up (bloat) then fuse into a liquid which would cool as a glass. Or course in ceramics we don't

fire that hot; we stop at the point where we have just enough fusion and hardness for durability, but not too much so we cause melting or deformation of the ware. This point is called the maturing of the clay.

____________________________________________________________________________________________


COPYRIGHT Lakeside Pottery LLC ; COPYRIGHT details and linking policy; Protected by Copyscape including reporting to search engines